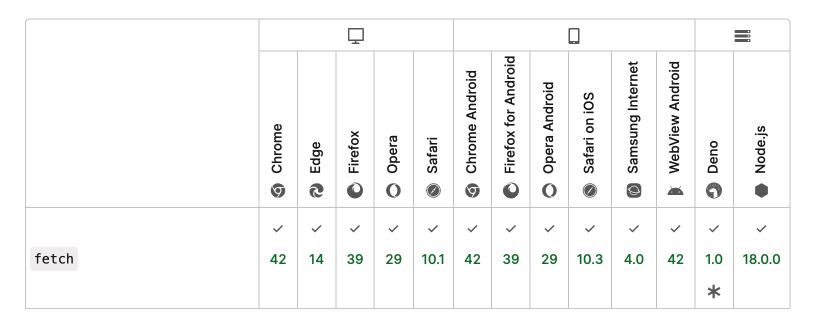
Nextjs 13 版本后为整个服务扩展了 Web Fetch API,在之前,我们无法直接在服务端使用 Fetch 来发送请求,只能借助一些第三方库实现类型的功能,如 axios,node-fetch, got。
国内开发者,在某些业务场景下(如服务在国内,需要发送 GPT 请求,或在本地开发时),我们需要为 Fetch 设置代理。
Fetch VS XHR
Fetch API 和 XMLHttpRequest(XHR)是用于在 Web 应用程序中发起网络请求的两种不同的技术。它们之间的区别包括以下几点:
- 使用方式:
Fetch API基于Promise,使用起来更加简洁和友好,而XMLHttpRequest则基于事件机制实现请求成功与失败的回调,使用起来相对繁琐和混乱。 - API 设计:
Fetch API采用了模块化设计,API 分散在多个对象上(如Response对象、Request对象、Headers对象),相比之下,XMLHttpRequest的 API 设计并不是很好,输入、输出、状态都在同一个接口管理。 - 功能特性:
Fetch API通过数据流(Stream对象)处理数据,可以分块读取,有利于提高网站性能表现,减少内存占用,对于请求大文件或网速慢的场景相当有用。而XMLHttpRequest对象不支持数据流,所有的数据必须放在缓存里,不支持分块读取。
总的来说,Fetch API 相对于 XMLHttpRequest 具有更加现代化的特性,使用起来更加简洁和灵活,是当前 Web 应用程序中推荐的网络请求技术之一。

Nodejs Fetch 的代理设置
Fetch Api 在 17.5.0 被实现(但依然处于 🧪 实验模式), Nodejs 18 版本可直接使用。
Fetch 的实现来自 undici,并受到最初基于 undici-fetch 的 node-fetch 的启发。 Repo Pull Request #41811
const res = await fetch("https://nodejs.org/api/documentation.json");
if (res.ok) {
  const data = await res.json();
  console.log(data);
}
ProxyAgent
ProxyAgent 是 undici 库中的一个模块,用于设置代理。通过 ProxyAgent, 可以将 HTTP 或 HTTPS 请求路由到指定的代理服务器。这在需要通过代理访问外部资源的场景中非常有用。以下是一个示例代码,演示了如何在 undici 中使用 ProxyAgent:
这里我们需要安装 undici, 在项目终端执行 pnpm install undici
import { ProxyAgent, setGlobalDispatcher } from "undici";

const proxy = "http://username:password@ip:port";
const proxyAgent = new ProxyAgent(proxy);
setGlobalDispatcher(proxyAgent);
现在,所有通过 undici 发起的请求都会经过指定的代理服务器。
我们首先引入了 ProxyAgent 和 setGlobalDispatcher 模块, 然后创建了一个代理对象 proxyAgent,并通过 setGlobalDispatcher 将其设置为全局的调度器。 所有通过 undici 发起的请求都会经过指定的代理服务器。
setGlobalDispatcher 是什么?
在 undici 中,setGlobalDispatcher 是用来设置全局分发器的。全局分发器是 undici 的一个重要概念,它用于控制请求的调度和处理。通过 setGlobalDispatcher,你可以自定义全局分发器的行为,以满足特定的需求。
设置全局分发器可以让你对请求的调度和处理进行更精细的控制,例如自定义连接池、请求重试机制、超时处理等。这样可以根据项目的特定需求来定制化请求的处理流程,提高系统的灵活性和性能。
总之,setGlobalDispatcher 是 undici 中用来设置全局分发器的方法,可以帮助你对请求的调度和处理进行定制化配置。
如果只需要为某个请求设置代理,可以为 fetch 设置 dispatcher
import { ProxyAgent, fetch } from "undici";

const proxy = "http://username:password@ip:port";
const proxyAgent = new ProxyAgent(proxy);

const response = await fetch("https://example.com", {
  dispatcher: proxyAgent,
});
在 undici 中,ProxyAgent 的全部属性包括:
uri:代理的 URLtoken:用于身份验证的凭据timeout:代理请求的超时时间keepAlive:是否保持与代理服务器的长连接maxSockets:与代理服务器建立的最大连接数maxFreeSockets:保持空闲状态的最大连接数maxCachedSessions:最大缓存的会话数
Nextjs 的代理设置
Nextjs 的 Fetch 是基于 undici 做的实现,那么实现起来就很简单了。
import { ProxyAgent } from "undici";

export async function queryPost(context) {
  const proxyUrl = "http://username:password@ip:port"; // 代理的URL
  const response = await fetch("https://example.com", {
    agent: new ProxyAgent(proxyUrl), // 使用代理的URL
  });
  return response.json();
}
如果要全局代理,可以在主入口文件 App Route layout.tsx 里设置
LOCAL_FETCH_PROXY 环境变量是我本地的 .env 文件的设置,实际根据运行环境的代理来设置即可
import { ProxyAgent, setGlobalDispatcher } from "undici";

if (process.env.LOCAL_FETCH_PROXY) {
  setGlobalDispatcher(new ProxyAgent(env.LOCAL_FETCH_PROXY));
}
为 AI 设置代理
OpenAI
这里无法使用 undici 的 ProxyAgent 了, 因为它并不是有效的 Agent 实例, 我们这里安装 pnpm i https-proxy-agent。
https-proxy-agent 由 http.Agent 实现。
import http from "http";
import HttpsProxyAgent from "https-proxy-agent";

// Configure the default for all requests:
const openai = new OpenAI({
  httpAgent: new HttpsProxyAgent(env.LOCAL_FETCH_PROXY),
});

// Override per-request:
await openai.models.list({
  baseURL: "http://localhost:8080/test-api",
  httpAgent: new http.Agent({ keepAlive: false }),
});
GoogleGemini
🫥 官方的 @google/generative-ai 目前不支持设置代理, 我们只能使用 REST API 了, 这里使用 fetch 发送,它会走 undici 的全局代理。
const API_KEY = "Gemini_Token";

fetch(
  `https://generativelanguage.googleapis.com/v1beta/models/gemini-pro:generateContent?key=${API_KEY}`,
  {
    method: "POST",
    headers: {
      "Content-Type": "application/json",
    },
    body: JSON.stringify({
      contents: [
        { parts: [{ text: "Write a story about a magic backpack." }] },
      ],
    }),
  }
);